
Table of Content
- Introduction
- Installation of Windows Containers
- Creating and running a Windows Container
- Conclusion
Efficient use of computing resources can reduce a cost of hardware and maintenance within organizations. Back in the day virtualization made a big difference but is the containers technology going to make the same difference in the market? Microsoft is adopting the container technology and this blog post is going to take a closer look at Windows Containers which is powered by Docker.
Introduction
Microsoft is partnering with Docker to enable creation, management, and deployment both Windows Server and Linux-based containers from the Windows platform. Docker allows you to package applications with all the dependencies into a standardized unit. Containers are very popular in the software development but it has a lot of potential in the IT operations within organizations. Containers have a resource isolation and allocation benefits like virtual machines but a different architectural approach allows them to be much more portable and efficient.
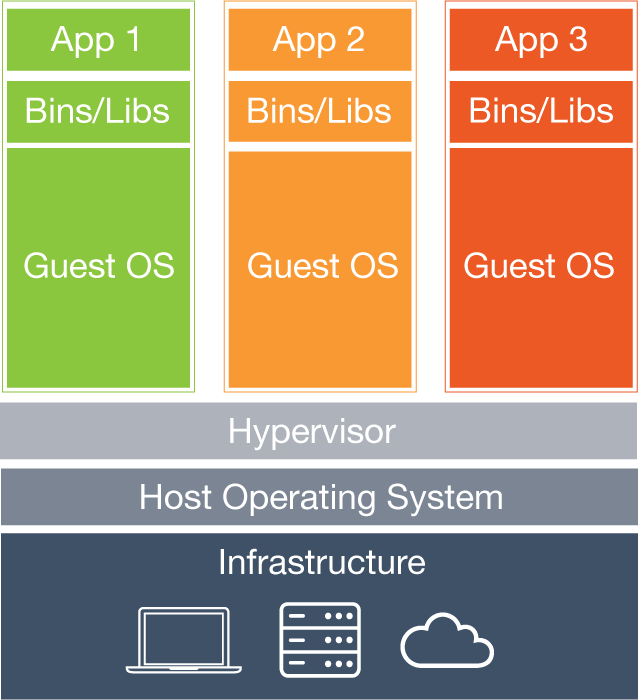
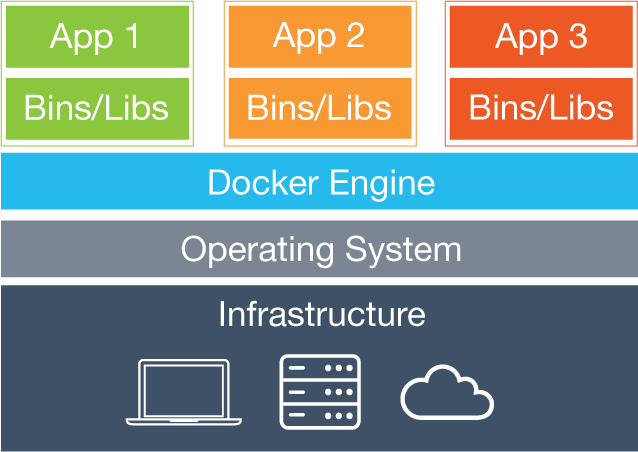
Source: Docker.com
Within the technical previews of Windows Server 2016, Docker is available.
Installation of Windows Containers
During my hands-on experience, I followed multiple guides and can highly recommend the Windows Container Documentation site from Microsoft. Please note an internet connection on the server is required.
The first step is to enable the Windows Containers feature. This can be done by using a PowerShell command or through the Server Manager. In this example, the PowerShell command is used.
Install-WindowsFeature containers
After the feature is enabled the server needs to be rebooted.
In order to manage the Container Images, the PowerShell module needs to be installed.
Install-PackageProvider ContainerImage -Force
After this, you are able to list the available Container Images.
Find-ContainerImage
These Container Images are queried from the internet and must be installed.
Install-ContainerImage -Name WindowsServerCore
This can take a while depending on your internet connection because the WIM file is downloaded.
The last part of the installation will be installing the Docker service and engine. Microsoft provides a script that downloads all the required files and installs Docker on the server.
Invoke-WebRequest https://aka.ms/tp5/Update-Container-Host -OutFile update-containerhost.ps1
Execute the script in order to install Docker.
.\update-containerhost.ps1
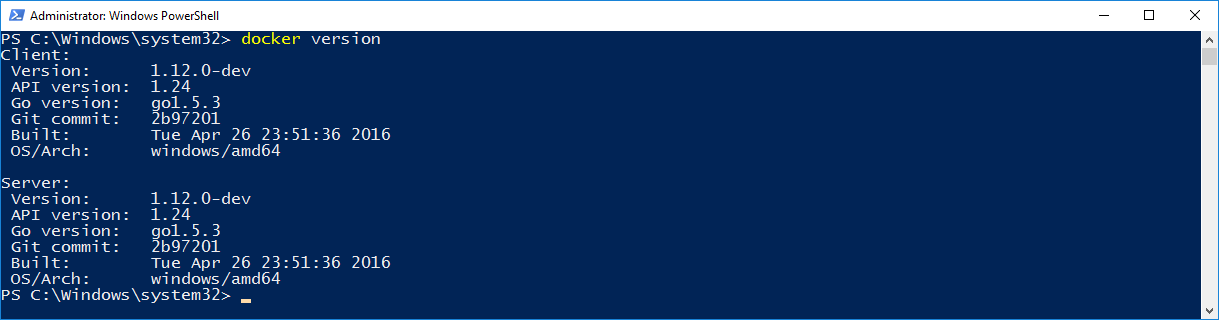
When the script is complete the installation can be verified by running the command “docker version”. This will provide a response with the details of the Docker client and server.
docker version
Creating and running a Windows Container
Now Docker is installed you are ready to create and run containers. During the installation, a image has been installed and this can be verified by Docker.
docker images

As the result shows there is one image available with a specific tag. When running a container the image cannot be found because by default the tag latest is used. Therefore it is recommended to create a latest tag for the “Windows Server Core” image.
docker tag [image id] windowsservercore:latest
Now there are two images available with one of them tagged as the latest.
docker images

Now we are going to create a container running IIS with a custom landing page. First, a container needs to be started.
docker run --name iisbase -it windowsservercore cmd.exe
The command prompt will be shown in the same window and now the feature IIS can be enabled.
powershell -Command "& {Install-WindowsFeature web-server}"
After IIS is enabled we can remove the default IIS start page and add a basic page with a custom text.
del "C:\inetpub\wwwroot\iisstart.htm"

echo "Hello World From a Windows Server Container" > C:\inetpub\wwwroot\index.html
After this is done the container can be closed by just the exit command.
Now the base of the IIS container is created and this can be committed as an image so it can be re-used.
docker commit iisbase windowsservercoreiis
When the commit is completed the image is listed in the overview.
docker images

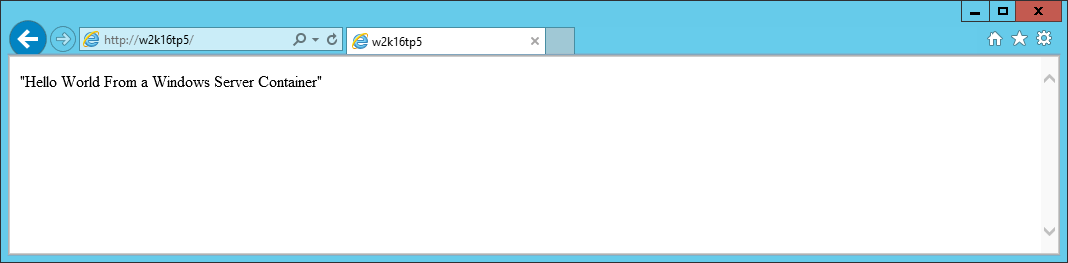
A container can be started based on the IIS image that we just created. Because the container needs to be accessible from the outside the port needs to be specified.
docker run --name iisdemo -it -d -p 80:80 windowsservercoreiis
Now the website is running hosted within a Windows container and accessible by port 80. Please note in this example I’m browsing the website from another machine.
In order to stop the container, the following command can be used.
docker stop iisdemo
Conclusion
My first attempt was not going how it should be and I ran into a lot of issues. In my second attempt, I was able to get Windows containers up and running quite quickly. While this introduction is very basic it provides a good understanding how Window container works. Containers enable to isolate applications and make optimal use of the computing resources. I hope this hands-on blog post is useful and if you have feedback or questions please leave a comment.