Table of Content
- What is pester
- Integrating Pester in the pipeline
- Interpreting the test and code coverage results
- Branching strategy
- Conclusion:
With the increase in Azure DevOps usage, more and more EUC environments are being deployed using pipelines. In the EUC environments, PowerShell is the primary scripting language to get these deployments automated. By using Pester the quality of the produced PowerShell code can be increased, which will result in a higher success rate of the DevOps pipeline. This blog post will provide some guidance and pointers how to use Pester in the Azure DevOps pipelines.
What is pester
Before going into the details let’s start with the basics, so what is Pester?
Pester is the ubiquitous test and mock framework for PowerShell. Adding Pester tests to PowerShell code will enhance code quality and allows you to start creating predictable changes. Pester integrates nicely with TFS (Team Foundation Server), Azure, Github, Jenkins, and other CI servers, allowing you to fully automate your development lifecycle.
For more information please visit: Pester - The ubiquitous test and mock framework for PowerShell)
It is important to understand using Pester is an investment to increase the code quality. This does mean it will require additional time to create and maintain the tests. From experience, some teams will say it feels like overhead and complex, but in the end, using Pester will provide proof the quality is high and will increase success rate of the Azure DevOps pipelines.
There are multiple guides available to help getting started with writing Pester tests. It is recommended to get familiar with the Pester syntax before continuing with the integration into the Azure DevOps pipeline.
Integrating Pester in the pipeline
There are multiple ways to integrate Pester into the Azure DevOps pipeline. It is possible to install a plugin from the Azure DevOps marketplace. An alternative way is using a PowerShell script as the Pester engine. Using your own PowerShell script does provide more flexibility and better control.
The following script is an example Pester engine which has multiple parameters. The publish switch will enable the tests and code coverage results, which can be collected in the pipeline. This engine is written to be used in both the Azure DevOps pipeline but also locally.
param (
    [Parameter(Mandatory = $true)]
    [string]
    $ModulePath,

    [Parameter(Mandatory = $false)]
    [switch]
    $Publish,

    [Parameter(Mandatory=$false)]
    [string]
    $ResultsPath
)

$pesterModule = Get-Module -Name Pester -ListAvailable | Where-Object {$_.Version -like '5.*'}
if (!$pesterModule) {
    try {
        Install-Module -Name Pester -Scope CurrentUser -Force -SkipPublisherCheck -MinimumVersion "5.0"
        $pesterModule = Get-Module -Name Pester -ListAvailable | Where-Object {$_.Version -like '5.*'}
    }
    catch {
        Write-Error "Failed to install the Pester module."
    }
}

Write-Host "Pester version: $($pesterModule.Version.Major).$($pesterModule.Version.Minor).$($pesterModule.Version.Build)"
$pesterModule | Import-Module

if ($Publish) {
    if (!(Test-Path -Path $ResultsPath)) {
        New-Item -Path $ResultsPath -ItemType Directory -Force | Out-Null
    }
}

$tests = (Get-ChildItem -Path $($ModulePath) -Recurse | Where-Object {$_.Name -like "*Tests.ps1"}).FullName

if ($Publish) {
    $files = (Get-ChildItem -Recurse | Where-Object {$_.Name -like "*.psm1" -or $_.Name -like "*.ps1" -and $_.FullName -notlike "*\Pipelines\*"}).FullName
    Invoke-Pester $tests -OutputFile "$ResultsPath\Test-Pester.xml" -OutputFormat NUnitXml -CodeCoverage $($files.FullName) -CodeCoverageOutputFile "$($ResultsPath)\Pester-Coverage.xml" -CodeCoverageOutputFileFormat JaCoCo
} else {
    Invoke-Pester $tests
}
In order to execute the Pester tests in the pipeline, 3 steps need to be implemented:
- Executing the Pester tests using the engine
- Publishing code coverage results
- Publishing unit tests results
Quick side note, the following pipeline examples are the YAML-based pipelines running on a Windows-based machine.
Executing the Pester tests using the engine
The first step is to start the engine and execute all the available Pester tests. This is done by using the following block:
    - task: PowerShell@2
          displayName: 'Executing Pester Tests'
          inputs:
            filePath: '$(System.DefaultWorkingDirectory)\Pipelines\PowerShell\Pester.ps1'
            arguments: '-ModulePath $(System.DefaultWorkingDirectory) -ResultsPath $(System.DefaultWorkingDirectory)\Publish -Publish'
            errorActionPreference: 'silentlyContinue'
            ignoreLASTEXITCODE: true
It is important to set the error action preference on silently continue, as some tests might fail. Any errors will be handled in step 3.
Publishing code coverage results
Code coverage is very useful to validate if the tests are covering all the lines of the tested script or module. Now in the ideal situation achieving 100% coverage should be the goal, but you might encounter scenarios that cannot be tested. When encountering these exceptions, it is important to document it so you can always refer back to this.
The engine will produce the tests and code coverage results in a separate directory. In this example the directory will be “Publish”. In Azure DevOps these results can be published by using the following block:
        - task: PublishCodeCoverageResults@1
          displayName: 'Publish Code Coverage'
          inputs:
            codeCoverageTool: 'JaCoCo'
            summaryFileLocation: '**/Pester-Coverage.xml'
            pathToSources: '$(System.DefaultWorkingDirectory)\Publish'
            failIfCoverageEmpty: true
As specified in the engine the code coverage results are produced in the JaCoCo format. As the code coverage results are mandatory, the pipeline will fail if these are not available.
Publishing unit tests results
The final step is publishing the unit tests. If a test has failed it is important the pipeline will fail as well. This way the pipeline will not continue and any errors encountered will need to be resolve before you can continue.
        - task: PublishTestResults@2
          displayName: 'Publish Pester Tests'
          inputs:
            testResultsFormat: 'NUnit'
            testResultsFiles: '**/Test-Pester.xml'
            pathToSources: '$(System.DefaultWorkingDirectory)\Publish'
            mergeTestResults: true
            failTaskOnFailedTests: true
Once the pipeline has run successfully, both test and coverage results will be available.
Interpreting the test and code coverage results
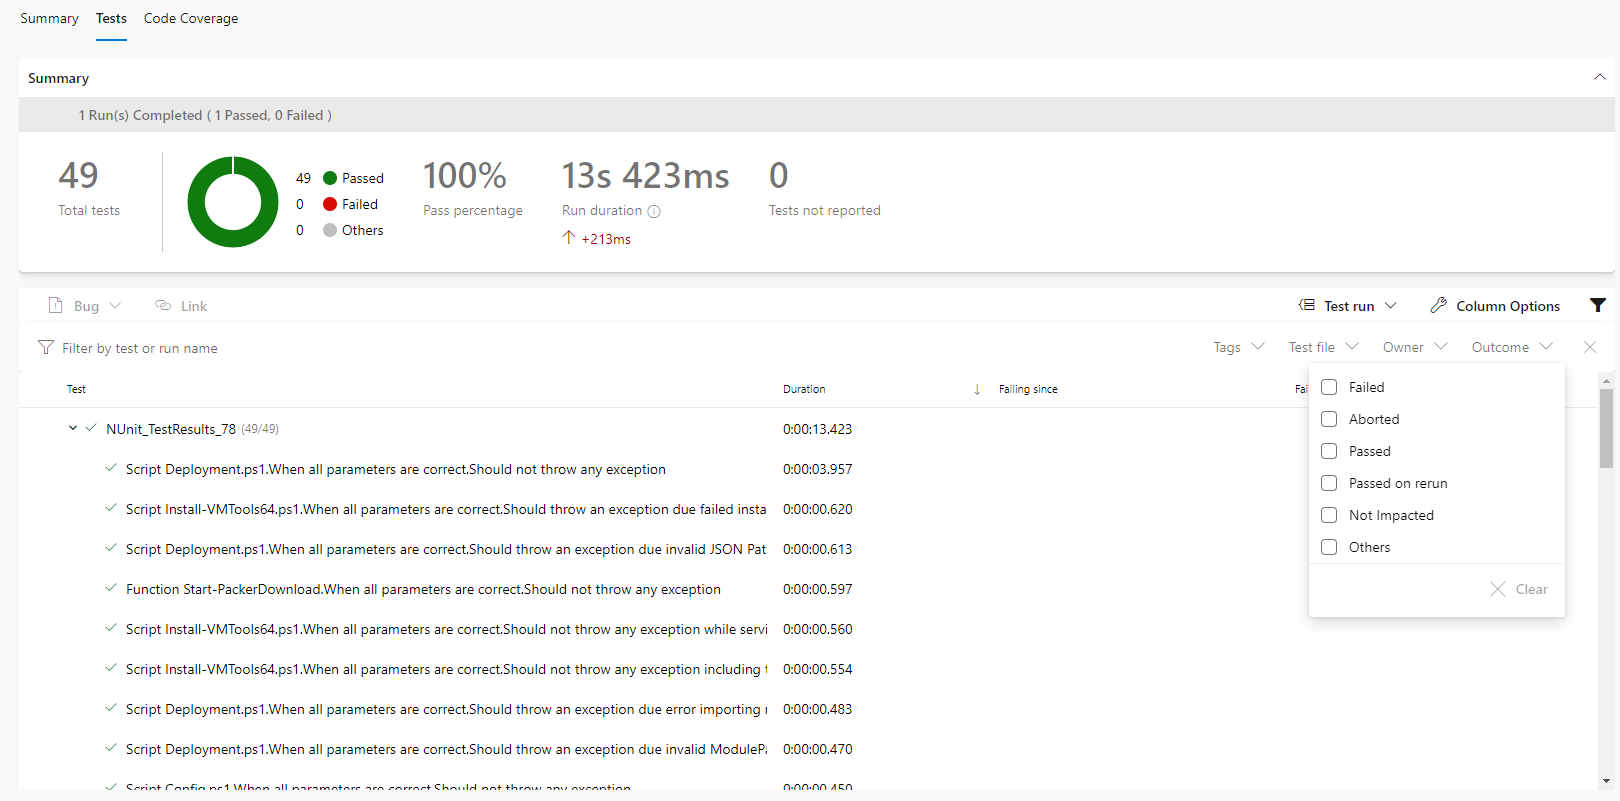
There are two pages available, a test results page and a code coverage page. The test results page will show all executed tests and directly show the failed tests.
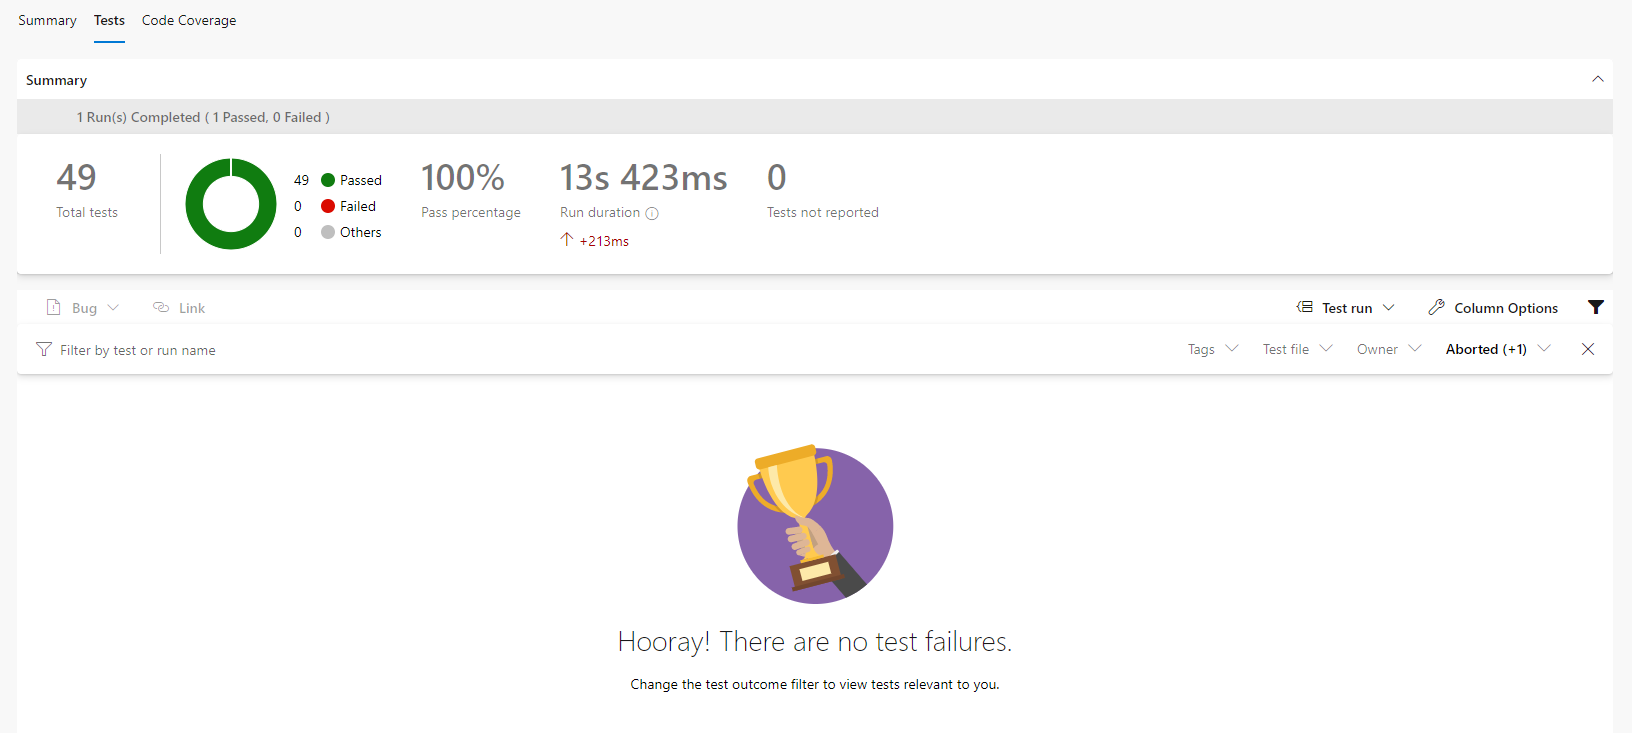
By default, a filter is applied to only show the aborted and failed tests. By deselecting these options, all tests will be shown.
The code coverage tab will show the code coverage of each script and module that were included in the tests.
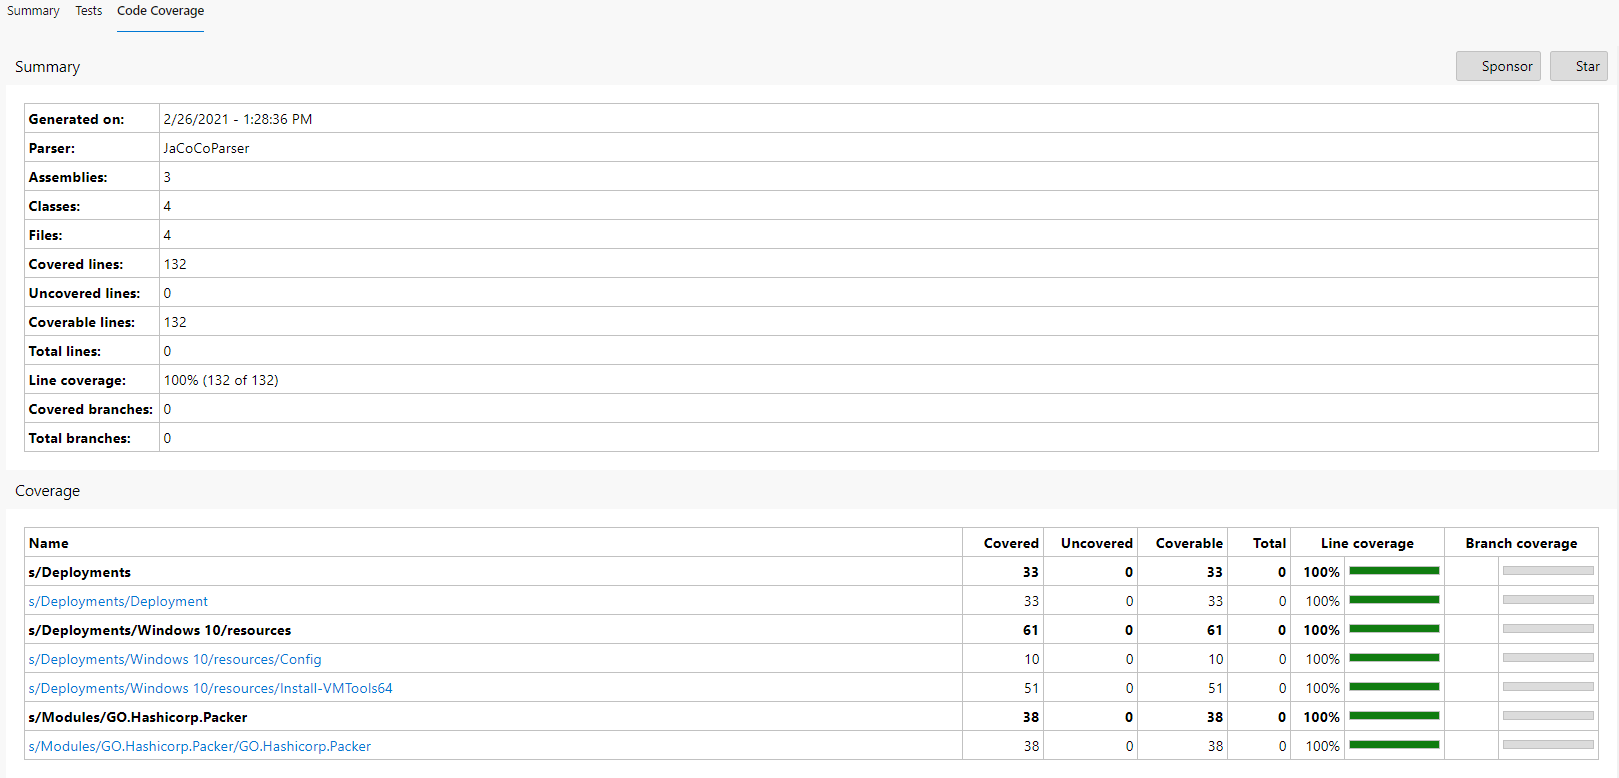
The code coverage page does provide the capabilities to open a specific script or module. This will show the overview of each individual function.
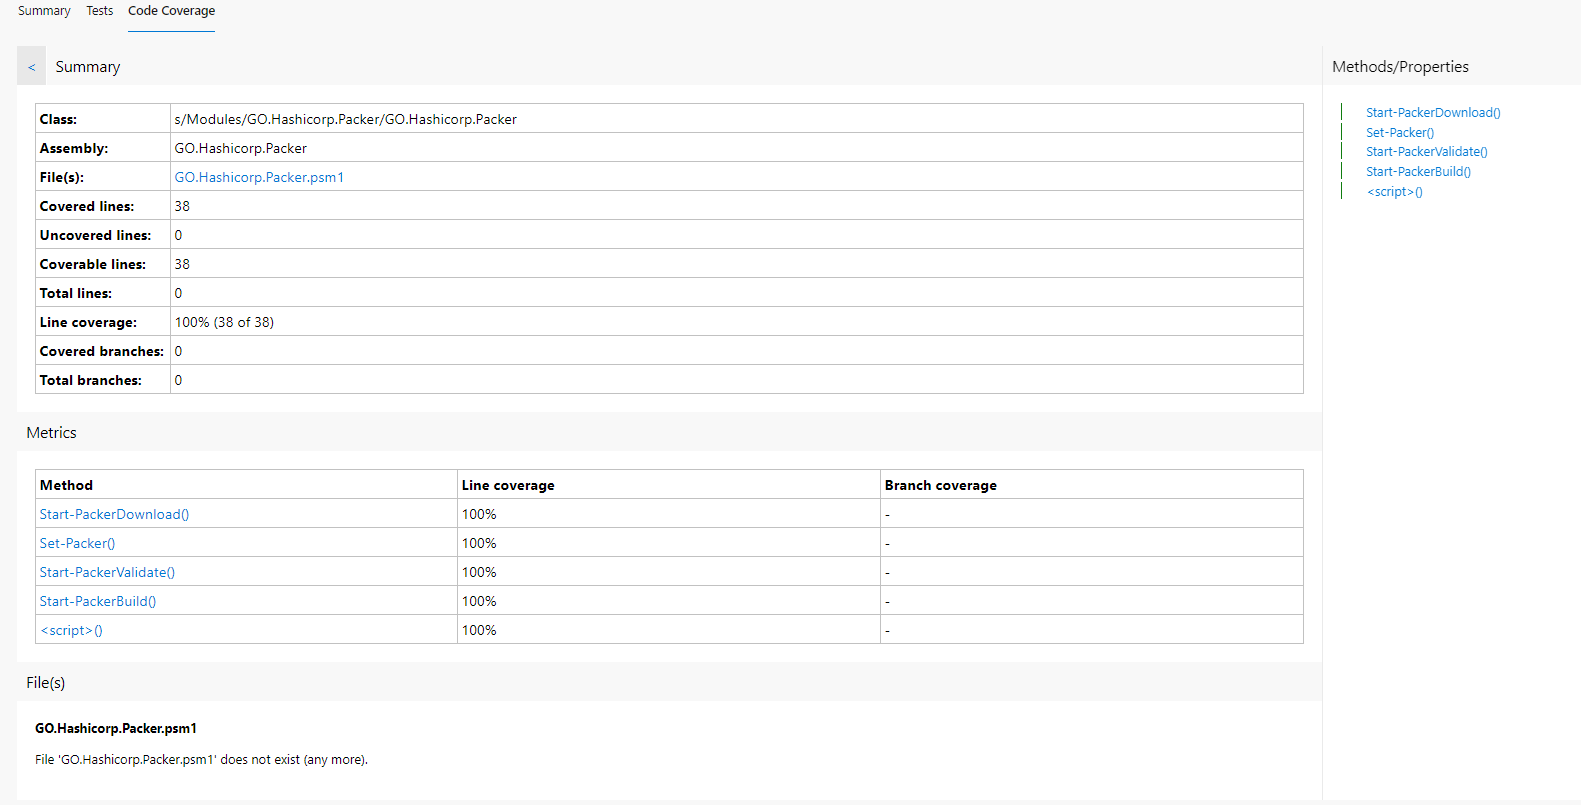
Unfortunately for some reason I did not manage to get the full file coverage working as files are missing. The pathToSources parameter is specified in the pipeline, but the files are not included. So if you managed to get this working, please share it in the comments below.
Branching strategy
It is important to have a clear branching strategy and it is recommended to adopt something like GitFlow. Now while developing new functionality you don’t want to run the entire pipeline which includes a deployment, this can be managed using a multi-stage pipeline.
More information can be found here: Azure DevOps Pipelines – Multi-Stage Pipelines and YAML for Continuous Delivery.
This way the Pester tests can run on any commit, while the deployment stage is only running in a specific branch. This can be done using a condition on the stage.
For example:
condition: contains(variables['build.sourceBranch'], 'refs/heads/main')
Now combining all the options results in a multi-stage pipeline that includes Pester testing.
name: 'GO-EUC Deployment Pipeline'

trigger:
- main
- develop
- features/*

stages:
  - stage: Pester
    displayName: "Pester testing"
    pool: GO-EUC
    jobs:
      - job: Pester
        workspace:
          clean: all
        steps:
        - task: PowerShell@2
          displayName: 'Executing Pester Tests'
          inputs:
            filePath: '$(System.DefaultWorkingDirectory)\Pipelines\PowerShell\Pester.ps1'
            arguments: '-ModulePath $(System.DefaultWorkingDirectory) -ResultsPath $(System.DefaultWorkingDirectory)\Publish -Publish'
            errorActionPreference: 'silentlyContinue'
            ignoreLASTEXITCODE: true

        - task: PublishCodeCoverageResults@1
          displayName: 'Publish Code Coverage'
          inputs:
            codeCoverageTool: 'JaCoCo'
            summaryFileLocation: '**/Pester-Coverage.xml'
            pathToSources: '$(System.DefaultWorkingDirectory)'
            failIfCoverageEmpty: true
            additionalCodeCoverageFiles: '$(System.DefaultWorkingDirectory)/**/*.ps*'

        - task: PublishTestResults@2
          displayName: 'Publish Pester Tests'
          inputs:
            testResultsFormat: 'NUnit'
            testResultsFiles: '**/Test-Pester.xml'
            mergeTestResults: true
            failTaskOnFailedTests: true

  - stage: Deployment
    condition: contains(variables['build.sourceBranch'], 'refs/heads/main')
    displayName: "Deployment Windows 10"
    pool: GO-EUC
    jobs:
      - job: Deployment
        workspace:
          clean: all
        steps:
        - task: PowerShell@2
          displayName: 'Start Deployment'
          inputs:
            filePath: '$(System.DefaultWorkingDirectory)\Deployments\deployment.ps1'
            arguments: '-WorkingDirectory $(Build.BinariesDirectory) -DeploymentJson "$(System.DefaultWorkingDirectory)\Deployments\Windows 10\Test.json" -ModulePath "$(System.DefaultWorkingDirectory)\Modules"'
Conclusion:
Pester is a powerful framework to increase the quality of the PowerShell code that is created. By integrating the Pester tests into the Azure DevOps pipeline will increase the success rate of your deployment. Now, this is, of course, depending on various factors but unit testing your code will prevent any unexpected changes that might break the pipeline.
Now it is important to keep in mind Pester is an investment and will require additional time to create and maintain the tests. Writing the tests will provide direct insight into how to improve the code, as it forces you to think about various conditions. In order to keep the standards high, commitment from the entire team will be necessary.
Are you using Pester in your Azure DevOps pipelines already? Share your thoughts or remarks in the comment below.
Photo by Crystal Kwok on Unsplash